Manage Students By Course
Important note: all students need an account to access your courses. When manually creating a account for the students, we recommend setting their role as Subscriber.
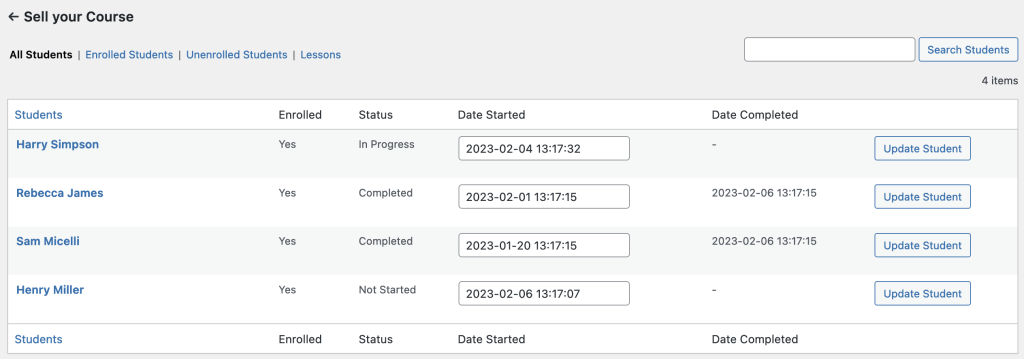
To manage your students, go to Sensei LMS > Courses to see a list of courses, and you should see a Manage button under the Students column.

Once you’ve clicked the Manage button for a particular course, a list of all students who were ever enrolled is displayed by default. This view can be filtered only to show those learners who are currently enrolled (Enrolled Students) or only those who are unenrolled (Unenrolled Students). On this page, you can remove a student from a course, add a student to a course, reset progress, remove progress, and edit the course start date.
Remove a Student from a Course
From Sensei LMS > Courses > Manage page, hover over the student’s name and click the Remove Enrollment link.

Another way to remove a student’s enrollment in a course is to find the appropriate student in Sensei LMS » Students and click the three dots in the student’s row. Click the Remove from Course link that appears.
This will unenroll the student and revoke their access to the course. Please note that while student no longer has access to the course, their progress is preserved. This means they can pick up where they left off should they enrol in the course again later.
Add a Student to a Course
From Sensei LMS > Courses > Manage page, scroll to the bottom of the page, and you can add the student manually by entering the name or email address of the student under the “Add Student to Course” section, then click the add button. You can optionally choose to complete the course for the student by checking the Complete course for selected student(s) box. Multiple students can be added simultaneously:

Another way to add a student to a course is by visiting Sensei LMS > Students. Click the three dots in the student’s row and then click the Add to Course link that appears.
Reset Progress
To reset a student’s progress and have them start the course from the beginning, from Sensei LMS > Courses > Manage page, hover over the student’s name and click the Reset Progress link.
Note that the Reset Progress link is only displayed if the student is currently enrolled in the course.
Another way is to go to Sensei LMS > Students and click the three dots in the particular student’s row. Then, click the Reset Progress link that appears.
This will reset the course start date and set its status to Not Started. All lessons in the course will have their start date cleared and status set to Not Started.
Remove Progress
To remove a student’s progress, go to Sensei LMS > Courses > Manage page, hover over the student’s name, and click the Remove Progress link.

This will remove the student from the list of students enrolled in the course, effectively deleting any progress they have made. This means the student will need to start the course over from the beginning should they enrol again later.
Note that the Remove Progress link is only displayed if the student is not currently enrolled in the course.
Edit the Course Start Date
Go to Sensei LMS > Courses > Manage page. You can edit the course start date for the particular student by clicking in the text box that displays the current start date, selecting a new date from the calendar that appears, and clicking the Update Student button.

Note that updating the course start date does not affect the start dates of the course’s lessons.
Manage Students by Lesson
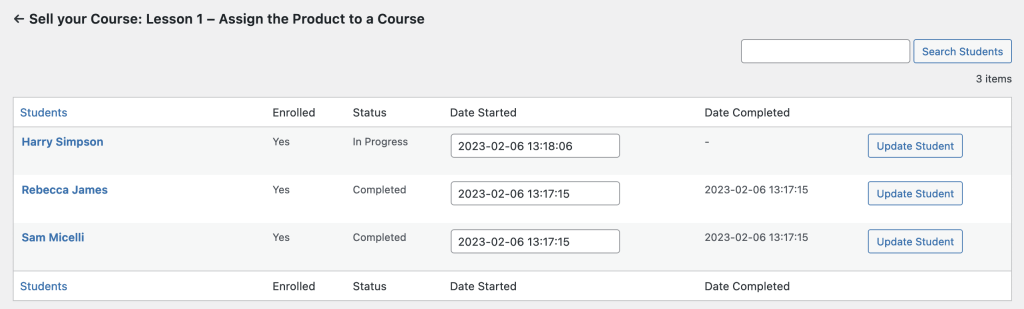
Go to Sensei LMS > Courses > Manage page and click the Lessons tab/link. This displays a list of all lessons in the course:

As with courses, the students for an individual lesson can be managed by clicking the Manage Students button. By default, a list of all students who ever viewed the lesson is displayed:
Add a Student to a Lesson
A student can be added to the lesson by scrolling to the bottom of the page, searching for and selecting them in the “Add Student to Lesson” section, and clicking the add button. This will also enrol the student in the course if they are not already taking it. You can optionally choose to complete the lesson for the learner by checking the Complete lesson for selected student(s) box. If the lesson has a quiz, the learner will automatically pass it. Multiple learners can be added simultaneously:

Reset Progress
To reset a student’s progress and have them start the lesson over from the beginning, hover over the student’s name, and click the Reset Progress link. This will reset the lesson status to In Progress. If the lesson has a quiz, this will also reset the learner’s grade for that quiz and remove their answers.
Edit the Lesson Start Date
You can edit the lesson start date by locating the student, clicking in the text box that displays the current start date, selecting a new date from the calendar that appears, and clicking the Update Student button.

Guest Students
Guest students are granted access to certain course content without creating an account or logging in. The Guest Students feature works with both the free Sensei LMS and Sensei Pro.
You can find the new option in the Course Settings to enable Open Access.
As guest students, and with the Open Access courses option, learners can explore and engage with specific course materials, such as lessons and quizzes, without having to commit to full enrollment.
This feature is particularly useful for those who want to sample a course or access limited content before deciding to enrol.
Read a little bit more about guest students here.
Preview As A Student
The Preview as a Student feature allows course instructors and site administrators to gain valuable insights into how the course looks and functions for their students.

To utilise this feature, follow these steps:
- Head to the course URL you want to preview while logged in as administrator or teacher.
- Locate the “Preview as a Student” option in the menu bar at the very top of the page. This is a menu bar only admins and teachers can see
- Click the “Preview as a Student” link to switch to the student view.
- Explore the course content, lessons, quizzes, and other elements just as your students would.
- You can switch back to your view by clicking the “Exit Student Preview” link.
The Preview as a Student feature empowers you to review better and optimize your course content, ensuring it meets the highest quality and usability standards.
You don’t need to go back and forth between previewing the course and seeing it as an unenrolled student, as you don’t need to log in as a student anymore to see what your students will see in your courses.